*Note: All photos courtesy of DesignPickle/stock.Adobe.com
History of the Layered Cocktail
Your local bartender may give you the cold shoulder if you order one of these time-consuming cocktails on a busy Friday night, but once upon a time, they were considered a fancy end to a meal. Because of the intricacy involved, these weren’t your average homemade cocktails!
To better understand layered drinks, we must first understand the history, especially the “pousse-café” (translated to “coffee pusher”), a French creation of 2-10+ liquids of varying densities served in layers.
(For context, it’s uncommon to go beyond a 4th layer with today’s layered cocktail ingredients.)
The 19th century after-dinner drink, popular across Europe as a digestif served following the coffee course, made its debut in the U.S. listed under the “fancy drinks” heading in Jerry Thomas’s 1862 edition of How to Mix Drinks.
So they are actually part of cocktail history and not just cheesy shooters for college kids!
Shortly after, the pousse-café began to lose its steam as a trendy, fancy cocktail, most likely because they are incredibly time-consuming to build each perfect layer and do not yield much profit, as well as the fact that traditionally they did not taste very good.
The impressive display of beautiful layers in a shot glass was just not enough. But in the 1960s and 70s, the market became saturated with colorful liqueurs, curacaos, and cream liqueurs, which brought life back to the layered cocktail.
Gone were the days of a fancy after-dinner night cap; the new layered cocktails were crafted towards fun, high-energy, night-out crowds in the form of shooters and mixed drinks.
Drinks like the B-52 cocktail, the Irish Flag, Slippery Nipple, Tequila Sunrise, and many more became all the rage.

Why layer your cocktails?
From a consumer’s point of view, the appeal is purely visual.The traditional pousse-café was meant to be sipped layer by layer, bandy by band, each offering a different spirit and flavor profile.
Because these layers were intended to be enjoyed individually, should the layers mix, it was not always palate-pleasing.
From the bartender’s point of view, there are a few reasons to layer a drink or shot: the first and most common is to make aesthetically-pleasing drinks, and of course to show off your mad skills behind the stick!
Second, and equally as cool, is flaming drinks. Because alcohol at its purest form is lighter than water, high-proof spirits are practically begging to be used as a “floater” and then set ablaze (like the image shown above). A flaming B-52 shot is truly impressive to see.
The downside to layered cocktails is that they are very time-consuming for a bartender to make.
And while their pouring skill is there to be admired, the time they put into building the distinct layers and not paying attention to other guests often comes at the price of a relatively cheap shot.

How Layers are Formed
Layering spirits is all about the specific gravity of the liquids that you are using. In layman’s terms, how heavy they are.
Specific gravity is the ratio of the density of a substance to the density of a standard. In the cocktail world, the standard that is used is water, which has a specific gravity of 1.0.
- Distilled spirits generally contain little to no sugar, making them lighter than water and allowing them to float atop your drinks that are based around sodas and juices.
- Liqueurs that have a higher sugar content are going to have a higher specific gravity. This is what makes them sink to the bottom.
PLANNING YOUR LAYERS
When building a layered shot or cocktail, sort out the liquids by heaviness (highest specific gravity to lowest) so you can pour them starting with the heaviest and finishing with the lightest.
As one might assume, the liquid with the highest specific gravity will be the liquid that is going to sit on the bottom of the glass as your first layer, and then work your way up the scale that you have created.

What are some common techniques?
There are a few techniques that will help you build a perfectly layered cocktail shooter. First, it is recommended to pour from a spout. If you don’t have a bottle spout, don’t worry; you can still use this technique, but just be a bit more careful!
Pouring from a bottle spout instead of the open bottle neck will help you control the amount of liquid you are pouring and help you be more accurate with your pour.
Why is accuracy important, you might ask? Because if you were to free-pour the second layer or any liquid after, even with a lighter specific gravity, there will be a certain amount of mixing that may cause your layered drink to cloud and cause the bands to appear less sharp or non-existent.
A common best practice is to use the back of a bar spoon for all of the layers after the first. Here are the steps:
BAR SPOON TECHNIQUE
The most common way that you’ll see bartenders creating layers is using a humble bar spoon. Here’s how:
- Step 1: Add the heaviest liquid to the bottom of the glass, and place the bar spoon in the glass. Press the nose of the spoon against the side of the glass just above– not touching— your preceding layer.
- Step 2: Gently pour your next liquid over the back of the spoon, being careful not to pour too quickly. (If you pour too fast, the layers will become cloudy.) This will help minimize the impact on the preceding layer and reduce the risk of mixing or clouding.
- Step 3: Continue this process, remember to work through your ingredients from heaviest in specific gravity to lightest.

No Spoon? No problem!
If a bar spoon is not something you have in your home bar kit, don’t worry! Any regular spoon will work – a wider spoon will actually be easier if you don’t have a bottle spout in your tool kit, either.
No spoons at all? Channel your inner cocktail MacGyver and use your garnishes…a cherry or a citrus wheel will surely get the job done (basically anything that can slow the speed of the liquid before it touches the previous layer of your cocktail).
SYRINGE TECHNIQUE
This technique is a good starting point for your journey into layered cocktails. Using a food-safe syringe allows much more control than pouring out of a bottle. It is also a good technique to use if you forgot a layer because you can use the syringe method to go back and add layers in between others.
- Step 1: Add the heaviest liquid to the bottom of the glass.
- Step 2: Fill a food-safe syringe with the correct amount of the next heaviest liquid.
- Step 3: Press the syringe against the inside of the glass just above the previous layer, and slowly press the plunger to release the liquid. (See note below.)
- Step 4: Repeat this process until all layers are complete!

NOTE: Keep the syringe at a shallow angle to the first layer; you want the liquid to come out of the syringe as flat as possible. If you hold it straight down, it will force the liquid into the first layer instead of spreading it across the top.
POURING DOWN THE GLASS
Some drinks, such as the Tequila Sunrise, call for a different technique: The cocktail is built first, and the layering follows.
The first step here is to combine all required ingredients (tequila, orange juice, and ice for a Tequila Sunrise) and blend by stirring or shaking. Once your drink is well-blended and perfectly chilled, you are ready to layer.
Because of the high sugar content of grenadine and similar ingredients, it will naturally want to sink to the bottom of your cocktail. However, you do not want it to linger in the center or turn the entire cocktail a reddish-pink hue.
To best avoid this, slightly tilt the cocktail glass and pour the grenadine down the inside of the glass…It should ride the glass all the way to the bottom and settle there.

Layered Cocktail Recipes to Try at Home
Detailed below are some popular layered cocktails, including one of my personal favorites, the Carajillo (a Spanish coffee cocktail).
The ingredients for each of the cocktails are listed from heaviest to lightest, so the first ingredient that you read will be the first that you pour when making each drink on this list of cocktails. Cheers!

B-52 ShOT:
Named after the band, this is one of the most popular shots for customers to order. Featuring the rich, milky taste of Bailey’s Irish Cream and a very light orange flavor, this coffee-flavored cocktail is an iconic classic. If you’d like the flavor of coffee without the caffeine buzz, you can use this B-52 shooter recipe:
- 1 part Coffee Liqueur (I like Gator Bite or Mr. Black)
- 1 part Baileys Irish Cream Liqueur (giving slight vanilla and cocoa flavors)
- 1 part Grand Marnier (an orange liqueur that offers a slight orange band at the top)
*As this would make a really intense full cocktail, serve in a standard shot glass.

Bob Marley:
The colorful, beautiful shot is named after the singer, Bob Marley, and is one of the more popular drinks in the layered category. It offers bands of color inspired by Jamaica and specifically the Rastafarian flag. Like a lot of layered drinks, there is a flaming drink variation, too.
(Take note that the yellow layer often looks orange because of the mixing of the yellow portion and the red.) Serve this refreshing drink in a shooter glass or a tall glass, depending on whether you want a shot or a whole drink. Grab the Bob Marley drink recipe here:
- 1 part Grenadine (maraschino cherry-flavored red layer)
- 1 part Galliano (sweet yellow layer, tasting of vanilla and licorice)
- ½ part Creme de Menthe (mint-flavored green layer,)
- ½ part Over-Proof Rum

Irish Flag:
Designed to emulate the colors of the actual Irish flag, the Irish flag shot uses two of the same ingredients as the first layered shooter cocktail in our list (and one from the Bob Marley), so you don’t have to buy extra ingredients for this one!
A St. Patrick’s Day alternative to Irish whiskey, the bright color differences and the flavors of the green creme and the orange liqueur are separated by a cream layer, making this a complex cocktail. Serve this shot recipe in a standard shot glass, as it would be overwhelming as a full drink.
- 1 part Creme de Menthe
- 1 part Baileys Irish Cream
- 1 part Grand Marnier

CARAJILLO:
Also known as Carajillo 43, this coffee cocktail is unique in that it actually uses real, strong coffee (rather than a coffee liqueur) and mixes hot coffee with ice cubes and Spanish Carajillo, offering a bitter coffee flavor that marries with sweet vanilla notes.
This is a simple mixed drink that has a layer of delicious coffee floating on top of the liquor– super easy! Serve in a rocks glass or brandy snifter.
- 1 ¾ oz Licor 43 (a Spanish liqueur that offers vanilla, berry, and floral flavors)
- 2 oz fresh shot of espresso (hot)
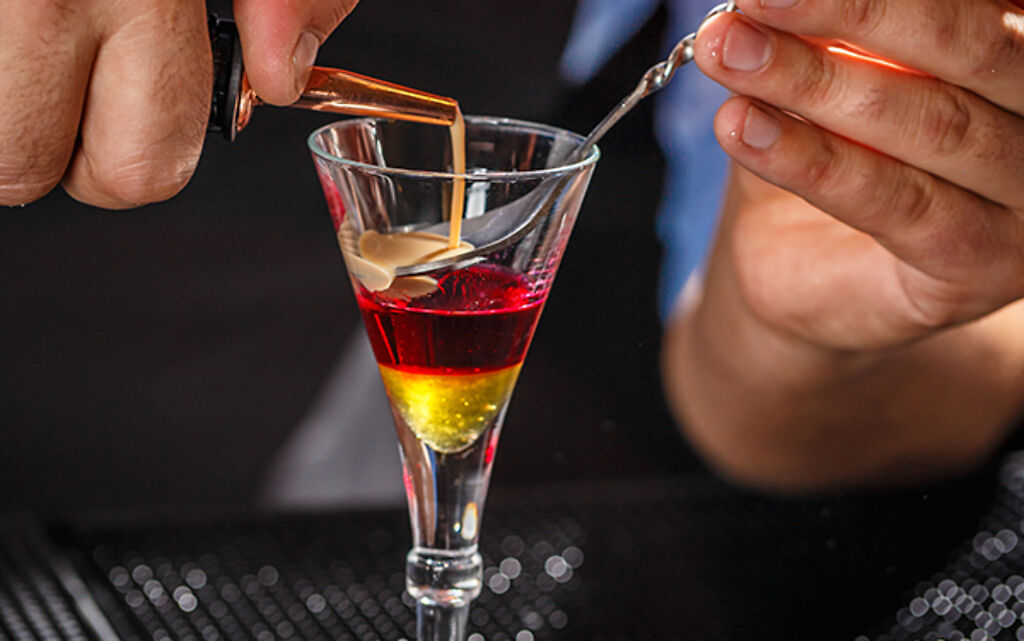
Photo courtesy of DesignPickle/stock.Adobe.com
WHAT’S YOUR FAVORITE LAYERED COCKTAIL?
Head over to the Craft Cocktail Club on Facebook to check out the many great examples of modern layered cocktails, such as, “Day Dreamin’” by Matthew Benevoli – a beautiful tri-layered tropical cocktail. Follow the link to view his step-by-step instructions on how to craft this cocktail at home.
Also, check out Kelly Miller’s NY Sour! This perfectly-executed example of the NY sour is sure to impress your guests at your next gathering.
So what layered shot do you love? Whether to drink or to make, we’d really like to hear your top picks and techniques in the comments or in our group. Happy mixing!